


When you have a good base recipe for soft white sourdough bread, you will want to keep using it. This sweet stiff starter sourdough recipe works so well for everything. This is the same base used for Shokupan Sourdough. I created this recipe using a high percentage of stiff starter to help to cut down proofing times and make the bread rise faster. These Sourdough Cinnamon Rolls only took 2 hours to proof before baking.
The texture is soft, fluffy and with no sourness.
The design of this Sourdough Cinnamon Rolls is inspired by the Onion Chinese Steamed Rolls. I found this style of shaping also works very well for Cinnamon Rolls.
GENERAL NOTES:
MILK POWDER
Why do I use milk powder?
- Milk or milk powder will enhance the flavour of the bread and makes the bread texture softer due to the fat content of the milk.
- Milk powder is shelf stable and you can have it anytime when you want to use. Unlike liquid milk you need to finish within a certain time before it spoils.
For kneading, please regard the timing provided as an indication only. It is only meant as a guide. Timing may differ depending on the brand of flour and electric mixer used. The protein content may vary from one brand of flour to another.
FLOUR
The right flour plays a very important role in bread making. To achieve fluffy, soft and light bread, I used Japan High Gluten Flour in most of my bread baking. The protein content is around 12 - 13%.
HYDRATION
The liquid measurement given is also a guide. It is advisable to always reserve some liquid and not add it all in one go. This would give you the opportunity to adjust if necessary. If dough is too dry, add the reserve liquid one tablespoon at a time until the right consistency. This is because each flour absorbs water and hydrates differently.
PROOFING
Please note that the proofing timing may also vary depending on your climate, environment, flour and your starter.
If you are unable to judge by just looking at the dough, you can do the finger poke test:
Proofing:
- Lightly press the side of the proved dough with your finger. If it bounces back immediately without any indentation, it means the dough is under proved and needs more time before baking.
- If the indentation stays and it doesn’t bounce back, it means it has been over proved.
- If the indentation slowly bounces back and leave a small indentation, it is ready to bake.
- There will be a final burst of rising once the bread is placed to bake in the oven and it is called oven spring.
If your bread collapses or gets wrinkled on top after removing from oven, it could be because your dough over proved during the second proofing. Please proof your dough until 80% - 90% of the original size. The bread will continue rising during baking.
BAKING
Do also note that the baking temperature and timing provided are what works for my oven and should also be regarded as a guide only. Every oven behaves a little differently, so please adjust accordingly for your oven.
SOURDOUGH STARTER
A healthy starter is very crucial as advised by Baking with Gina. It is advisable to feed your starter daily if you want your bread to rise nicely and to use the starter (levain) at its peak. A starter that is fed regularly will be more active in general.
If the mother starter is not strong, the bread dough will not rise a lot even though the starter is used at its peak.
When is a starter at its peak? My sourdough starter is usually at its peak when it is tripled in the jar. It usually stays at its peak for around 30 - 60 minutes before it starts to reduce/fall.
Why use starter at its peak? This is when the starter is most active and it will result in a better rise for your bread in general.
If you have any questions regarding this recipe or any other post, please leave me a comment in the “LEAVE A COMMENT” link and I will reply you as soon as possible.
RECIPE - SOURDOUGH CINNAMON ROLLS
INGREDIENTS:
Sweet Stiff Starter (50% Hydration):
70g sourdough starter (100% Hydration), use at its peak
215g bread flour (I used Japan High Gluten Flour)
90g water
35g sugar (I used organic brown sugar)
Main Dough:
150g bread flour (I used Japan High Gluten Flour)
All sweet stiff starter (above)
10g brown sugar (I used organic brown sugar)
1 1/8 tsp (7g) salt
35g milk powder (I used full cream/whole milk powder)
50g egg, whisked (from 1 egg), balance use for egg wash
80g water (reserve about 10g and add in later if needed), I used 80g of water for this bread
28g butter, room temperature
Filling:
55g sugar (I used brown sugar)
2 tsp ground cinnamon
40g butter, room temprature
55g raisin
Egg Wash: (Optional)
1 egg + 1 tbsp water
1 egg + 1 tbsp water
Syrup:
10g brown sugar
5g hot water
10 honey
Pinch of ground cinnamon
Pinch of salt
Utensil:
8" square pan, lined with parchment paper
METHOD:
- Sweet Stiff Starter
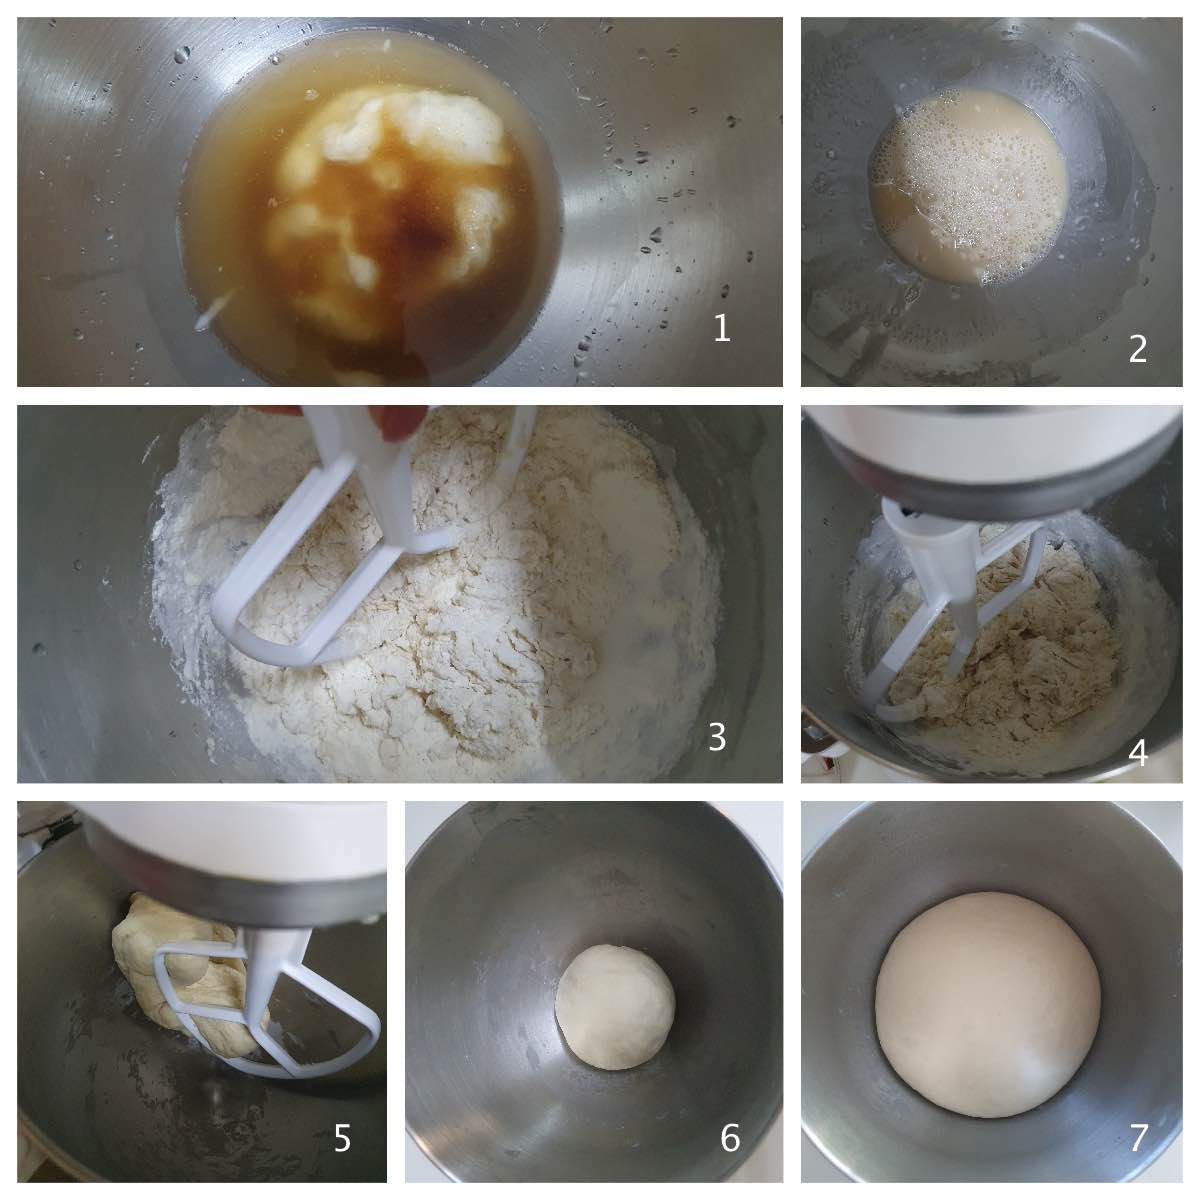
- In a bowl of stand mixer, dilute starter with water, stir in sugar and add in bread flour. Mix with paddle attachment until well mixed and all come together. It can be done by hand mixing too.
- Cover and let it ferment until tripled. I prepared a night before and leave it in aircond room (approximately 24 - 25C room temperature) overnight until tripled. It took about 7 - 8 hours depending on your starter. You can also prepare and leave on your kitchen counter, let it rise until triple in several hours and use at its peak. The starter should look smooth and round dome. It shouldn't have any dimples or it shouldn't collapse.
- Main Dough:
- Put all ingredients (except butter) into a bowl of stand mixer. I usually torn the stiff starter into pieces first.
- Slightly combine the mixture by hand with the paddle attachment before turning on the machine so that the flour will not splash out. Using the paddle attachment, mix for 2 minutes or until all incorporated. This step is critical to prevent an uneven mixed dough as the stiff starter is rather hard and a dough hook may not be able to mix it well enough.
- Change to hook attachment and knead for another 3 minutes or until the dough comes together. Add in butter and continue knead for 10 - 12 minutes or until the dough is silky and smooth and until reach window pane stage. The whole kneading process, I stopped few times to scrape down the dough from the hook to be sure it is evenly kneaded and also to prevent the motor from overheating.
- 1st Proofing/Resting:
- Round up the dough and let it rest for 15 minutes in the same bowl.
- Filling:
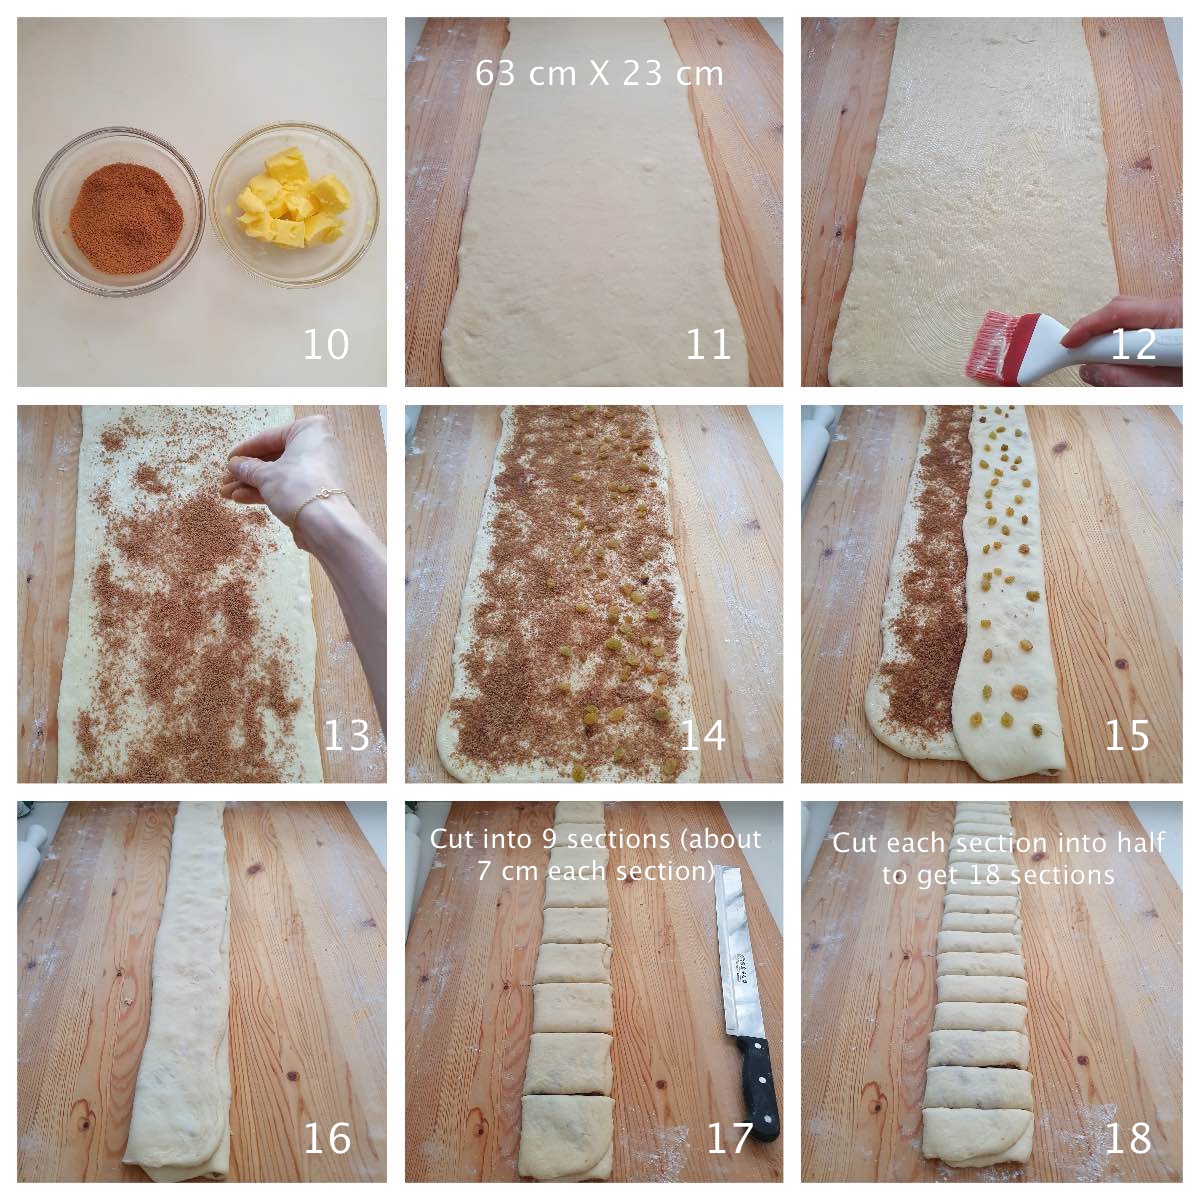
- Combine cinnamon powder and brown sugar in a small bowl. Set aside.
- Blanch the raisins with hot water, drain and dry with paper kitchen towel.
- Shaping:
- Transfer the dough to a clean floured surface.
- Roll out into a rectangle roughly about 63 cm X 23 cm.
- Spread the butter, sugar and cinnamon mixture and raisins evenly on the dough.
- Starting with the widest end, fold it into thirds like a letter.
- Divide and cut the dough into 9 equal sections (about 7 cm each section). Then cut each section into half to get total of 18 sections.
- Please watch the video how to shape the cinnamon rolls.
- Place all dough in the prepared loaf pan.
- Final Proofing :
- Let it proof at warm place until the dough double in size. This one took approximately 2 hours at room temperature of 28C - 29C. The duration of proofing depends on your ambient temperature and starter.
- Syrup:
- Dilute sugar with hot water in a small bowl. Add in honey, pinch of ground cinnamon and salt then stir until well combined. Keep aside.
- Baking:
- Preheat oven at 190C (top & bottom heat) for 10 - 15 minutes.
- Brush with egg wash and bake in a preheated oven for about 20 minutes, or until golden brown.
- Remove cinnamon rolls from oven and brush with sugar and honey syrup immediately. Let them cool on rack.
Sweet Stiff Starter
Main Dough

Please watch this video for shaping.
