

Who knew that browned butter could take your baking to a whole new level???
Last week we bought an unknown variety of apple. They were huge and firm. For my afternoon snack, I bit into one. SO TART! Ack! What to do? I figured it would bake nicely into a cake, if I chopped and simmered it a bit in some coconut palm sugar and pie spices. I thought immediately of my brown butter cake. Yum.
This cake is delicious on its own. I dont recommend any frosting with it, as that would detract from the brown butter richness. Fruit goes well with it. The original recipe calls for nectarines and raspberries on top of the batter, then cook. But you can make the cake without the fruit and serve plain; or serve cooked fruit over it. Or, as I did with the apples: I diced and simmered apples with coconut palm sugar, butter, salt, cinnamon, nutmeg, and cloves to taste; I poured the apple mixture over the batter, then baked the cake. Note: a 9-inch pan really means a 9-inch pan. If you use an 8-inch pan, the batter overflows. Yeah, I did that.
The information for browning butter is taken from my DVO Cookn weekly magazine a few years ago. Well, it must be a while ago, because I cant find the article in the archives. But I did find the recipe for the cake online. Both follow.
From DVO Cookn:
Brown butter is an undisputed shortcut ingredient to great cooking. It takes any kind of cake to a whole new level of complex, nutty deliciousness, and adds toasted flavors to blondies, cornbread, or even savory dishes like pasta, rice, or quinoa.
To brown butter:
STEP 1: Heat butter in a light-colored, heavy-bottomed pot over low heat until it has completely melted. The light color allows you to monitor the butters color as it browns and the heavy bottom ensures the butter heats evenly. Butter consists of clear yellowish butterfat, water, and milk proteins. Its the proteins that are actually browning
STEP 2: Cook off the water. Butter contains 13 to 17% water, which has to go before the fats temperature can rise enough to brown the milk proteins. Once the butter reaches a temperature of 212F, the water in the butter starts to quickly evaporate. As a result the butter will start to bubble and splatter dramatically. At this point you can place a splatter screen over the pan, though swirling the pan and stirring constantly to make sure any and all bubbles get released will work as well.
STEP 3: Begin the browning. After about five minutes the butter will start to foam. This is when you want to watch the butter like a hawk, stirring it around with your spatula to prevent the milk solids from sticking to the bottom of the pan.
You can tell the butter is browning because dark golden flecks (browned milk solids) will appear in the melted butter, which will start to smell nutty and toasty.
The foam can make it hard to see if the butter is browned to your liking, so to check the color, try clearing away some of the foam with a spoon or take the pan off the heat and spoon a little of the butter onto a white plate.
Once youre happy with the level of browning, pour the butterbrowned milk solids and allinto a heatproof bowl and stir it for one or two minutes to cool it down. If you were to leave the butter in the pan, the residual heat would continue to cook it, and the butter might scorch from a perfect brown to a burnt-tasting black.
Also, keep in mind that only the milk solids turn a dark golden brown, not the butter itself. The fat will be darker as well, but not as dramatically as the milk solids.
There are 3 basic kinds of browned butter. First theres golden brown. When you first start to see the milk solids appear, pull the pan off the stove. This version is perfect for incorporating into a salad dressing or a vegetable dish (roasted carrots with toasted nuts, for instance).
Next comes brown-brown butter. Even 15 seconds of further cooking and the milk solids get just a touch darker. Slightly darker means slightly richer in flavor, adding the perfect intricacies to finish pasta or fish dishes.
Lastly, theres nearly-blackened brown butter. Heres where you may think youve burned, or ruined it. This is the version of browned butter that most professional bakers cream into baked goods.
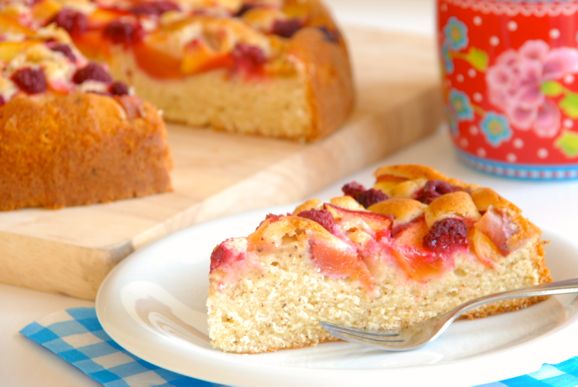
Recipe and photo from https://thetoughcookie.com/2013/10/16/brown-butter-cake-with-nectarines-and-raspberries/
Brown Butter Cake with Fruit
Yield: a 9 round cake
Prep Time: 30 min + 2-4 hrs cooling afterward
Cook Time: 50 min
- 1/2 cup plus 1 tablespoon browned butter cooled to room temperature
- 3/4 cup plus 4 teaspoons sugar
- 2 large eggs
- 1/2 cup plus 1 teaspoon milk
- 1/2 teaspoon vanilla extract
- 1 2/3 cups plus 3 teaspoons flour
- 2 2/3 teaspoons baking powder
- 1 teaspoon salt
- 3 nectarines
- 2/3 cup frozen raspberries
Directions:
1. Preheat your oven to 350F. Line a 9-inch cake pan with baking parchment. (The parchment will stick to the sides of the pan with a little bit of butter.) NOTE: The batter rises more evenly when the cake pan is lined with parchment. Simply buttering the pan will often result in a very domed cake.
2. Using a mixer, cream together the brown butter and the sugar in a medium-sized bowl, until the mixture has become slightly pale and fluffy.
3. Add eggs one at a time, mixing until incorporated after each addition and scraping the sides of the bowl with a rubber spatula when needed.
4. Add milk, vanilla, flour and salt; stir mixture with a spoon or rubber spatula, until flour is absorbed by the liquid. Mix with mixer until batter is completely smooth.
5. Pour batter into prepared cake pan.
6. Wash nectarines; cut them into little pieces.
7. Place nectarine pieces on top of the batter and sprinkle the raspberries (still frozen) on top. Completely cover top of the batter with fruit.
8. Bake approximately 50 minutes, or until a tester inserted in the center of the cake comes out clean. Serve either warm or cold, with whipped cream or vanilla ice cream.
Kathy notes:
I made the cake as directed, used my springform pan; baked 40 min.
Let the cake cool in the springform pan. It did help to line the pan with parchment first. After it cools, slide the cake off the springform plate/parchment paper and onto the large plate.
Note: If using blackberries, raspberries, or other berries with tiny seeds, then thaw/cook those in the pan first, and run through a sieve. The berry seeds are yucky with the cake.